CE Categories for RIBs Explained

You can find the information on the CE plate in your RIB @ RIBs ONLY - Home of the Rigid Inflatable Boat
Zodiac Pro 650 Open CE plate mounted twice © Karl Petermichl

What CE Design Categories Mean and Why They Matter for Buyers

CE categories appear on nearly every RIB sold within the European market, yet many buyers don’t fully understand what they mean.

These categories aren’t marketing claims; they’re regulatory classifications based on tested design criteria for specific operating conditions.

This guide explains what each CE category actually represents and how it should inform your buying decision.

What CE Marking Actually Certifies

CE marking on a recreational craft confirms compliance with the EU Recreational Craft Directive‘s safety and construction requirements.

This covers structural integrity, stability, buoyancy, and a range of other safety-related design criteria tested during certification.

It is not a performance rating or a guarantee of suitability for every condition; it’s a baseline regulatory standard.

The Four CE Design Categories

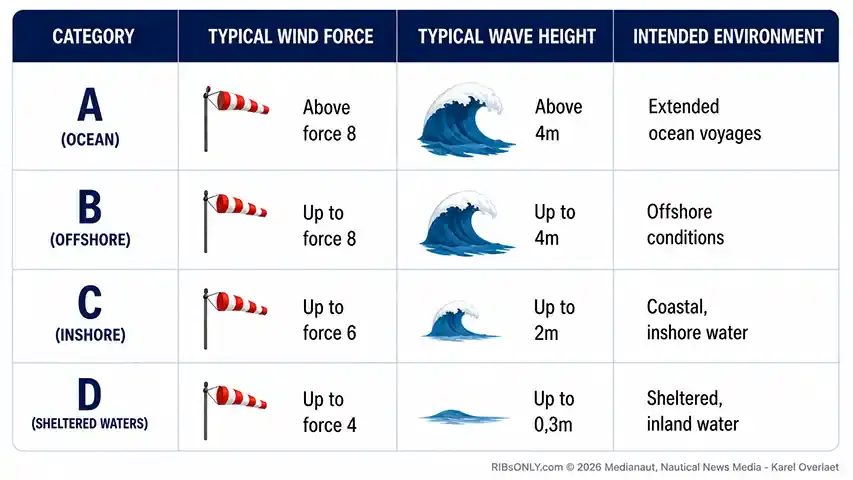
RIBs and other recreational craft are classified into four categories: A, B, C, and D, based on intended operating conditions.

Category A (Ocean) covers boats designed for extended voyages where wind conditions may exceed force 8 and significant wave heights exceed 4 metres.

Category B (Offshore) covers boats designed for offshore conditions up to force 8 winds and significant wave heights up to 4 metres.

Category C (Inshore) covers boats designed for coastal and inshore waters, typically up to force 6 winds and 2 metre wave heights.

Category D (Sheltered Waters) covers boats designed for sheltered, inland, or coastal waters with winds up to force 4 and wave heights up to 0.3 metres.

Why Category Matters When Buying

A boat’s CE category should directly match, or exceed, the conditions you actually intend to use it in.

Using a Category C boat in conditions that genuinely require Category B certification introduces real, avoidable risk.

Our guide Are Rigid Inflatable Boats Safe? explains how design and construction relate to safe operation within a given category.

Buying above your typical needs isn’t wrong, but it often adds cost, weight, and complexity without proportional benefit.

Category and Hull Design

Higher categories generally require more robust construction, better buoyancy reserves, and often correlate with deeper-V hull designs.

Our guide RIB Hull Shapes Explained explains how hull design relates to the kind of conditions a boat is built to handle.

This isn’t an absolute rule; some Category C boats are well-built and capable, while some Category B boats cut corners elsewhere.

Category Is Not a Complete Safety Guarantee

CE category reflects design intent and tested criteria, not ongoing maintenance, equipment, or skipper competence.

A well-maintained Category C boat, handled skilfully within its limits, can be safer in practice than a neglected Category B boat.

Our guide Essential Safety Equipment for a RIB explains how equipment and category work together to support genuine safety.

Checking a Boat’s Category

The CE category should appear on the builder’s plate, typically located near the helm or on the transom.

Always verify this documentation directly rather than relying solely on a seller’s or broker’s verbal description.

For used boats, confirm the category matches the original manufacturer specification, since modifications can sometimes affect actual compliance.

Category and Regulatory Requirements

Some regions or activities may require a minimum CE category for specific commercial or chartering purposes.

Check local regulations if you plan any commercial use, since requirements can differ meaningfully from private leisure use.

Our guide Professional and Rescue RIBs Explained touches on how commercial applications often involve additional regulatory requirements beyond standard CE categories.

How This Fits Into Your Buying Decision
CE Design Categories for Recreational Craft @ RIBs ONLY - Home of the Rigid Inflatable Boat

Match your intended use honestly to the appropriate category rather than defaulting to the highest available option.

Consider how often you’d genuinely encounter conditions at the upper end of a given category’s tested range.

Our RIB Buying Guide: How to Choose the Right Boat covers CE category alongside every other major specification decision.

Choosing the Right Category for Your Needs

Be realistic about your typical boating conditions rather than planning around rare, extreme scenarios.

A boat matched appropriately to your actual use is generally a better investment than an oversized safety margin rarely used.

Our pillar guide What Is a Rigid Inflatable Boat? covers how CE categories fit into the broader picture of RIB design and certification.


Frequently Asked Questions

Is a higher CE category always safer?
Not automatically. Higher categories mean more robust design for tougher conditions, but maintenance and skill matter just as much.

Where can I find a boat’s CE category?
Check the builder’s plate near the helm or transom, and confirm it against original manufacturer documentation.

Can a boat’s CE category change after modification?
Significant modifications can potentially affect a boat’s actual compliance with its original certified category.

Do I need a Category B boat for coastal use?
Not necessarily. Category C is designed specifically for coastal and inshore water within its tested conditions.


Related reading: What Is a Rigid Inflatable Boat? · Are Rigid Inflatable Boats Safe? · RIB Hull Shapes Explained · Essential Safety Equipment for a RIB · RIB Buying Guide: How to Choose the Right Boat

RIB Maintenance Schedule

RIB maintenance schedule @ RIBs ONLY - Home of the Rigid Inflatable Boat
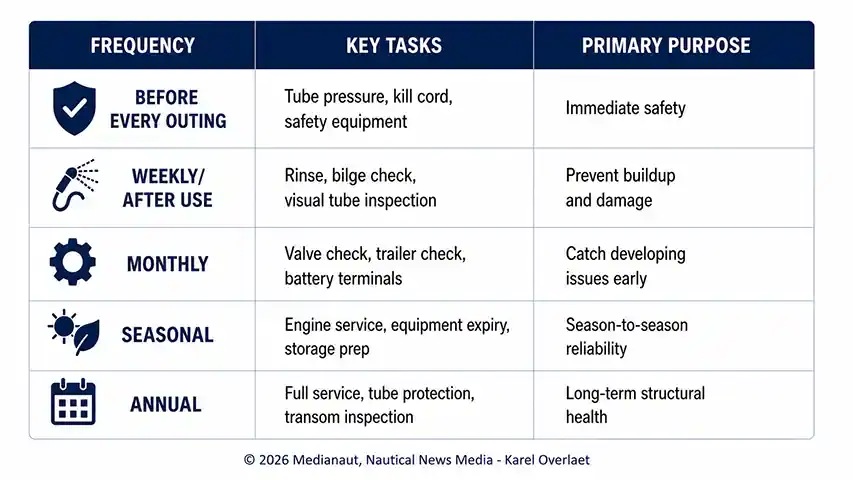
Main tasks – © 2026 Medianaut, Nautical News Media

A Practical Timeline for Keeping Your RIB in Reliable Condition

Consistent maintenance is what separates a RIB that lasts decades from one that develops expensive problems within a few years. Most maintenance tasks are simple, but they only work if performed on a predictable, regular schedule.

This guide provides a practical maintenance timeline covering the tasks that matter most across a typical ownership year.

Why a Maintenance Schedule Matters

Reactive maintenance, fixing problems only after they appear, is almost always more expensive than preventive maintenance.

A written or digital schedule helps ensure tasks aren’t forgotten, particularly for less frequent but important checks.

Our guide RIB Ownership Costs explains how consistent maintenance genuinely reduces total long-term ownership expense.

Before Every Outing

Check tube pressure visually and by hand before launching, since pressure changes with temperature and time.

Confirm the kill cord is present, functional, and worn correctly by the helmsman before getting underway.

Check fuel level, engine oil (if applicable), and that all required safety equipment is aboard and accessible.

Our guide Essential Safety Equipment for a RIB covers what should be checked and present before every trip.

Weekly or After Each Use

Rinse the boat with fresh water after saltwater use, paying particular attention to fittings and metal hardware.

Check the bilge for water accumulation and confirm the bilge pump is functioning correctly.

Inspect tubes visually for any new damage, abrasion, or signs of chafing against the trailer or dock.

Monthly Checks

Inspect tube valves for proper sealing and check overall tube pressure more thoroughly than a quick pre-launch check.

Check trailer tyres, lights, and coupling if the boat is regularly trailered between outings.

Our guide How to Trailer a RIB Safely covers trailer-specific maintenance in more detail.

Inspect battery terminals and connections for corrosion, particularly important during heavier-use periods.

Seasonal Maintenance (Start and End of Season)

At the start of the season, perform a full engine service or confirm recent servicing before returning to regular use.

Check all safety equipment expiry dates: flares, fire extinguisher pressure, and lifejacket inflation mechanisms.

Our guide Essential Safety Equipment for a RIB covers equipment-specific check frequencies in more detail.

At the end of the season, prepare the boat for storage, addressing any issues noticed during the year before they worsen.

Our guide RIB Winter Storage Guide covers the specific steps involved in proper seasonal lay-up.

Annual Maintenance Tasks

Schedule a full engine service annually, or based on running hours, whichever comes first according to manufacturer recommendations.

Our guide How to Choose an Outboard for a RIB touches on the servicing considerations relevant to different engine types.

Deep-clean and protect tubes with a UV-protectant treatment, extending material life regardless of PVC or Hypalon construction.

Our guide How to Clean and Protect RIB Tubes covers this process in detail.

Inspect the transom thoroughly for any signs of stress, flex, or degradation accumulated over the year’s use.

Our guide How to Inspect a RIB Transom covers this inspection process step by step.

Multi-Year Maintenance Considerations

Every few years, consider a more thorough tube inspection, checking seams, valves, and overall material condition closely.

Our guide Common RIB Tube Problems and Repairs covers issues that typically develop over several years of use.

Battery replacement, trailer bearing service, and steering system inspection are typically needed on a multi-year, rather than annual, cycle.

Building Your Own Maintenance Log

Keep a simple log of completed maintenance, dates, and any issues noticed, useful for both planning and resale value.

A documented maintenance history is a genuine selling point when the time eventually comes to sell the boat.

Making Maintenance a Habit, Not an Afterthought

Build these checks into your normal boating routine rather than treating them as separate, easily postponed chores.

Consistent, modest maintenance effort over time produces meaningfully better outcomes than sporadic, reactive attention.

Our RIB Ownership Costs guide explains how this consistency translates into genuine long-term savings.


Frequently Asked Questions

How often should I service my RIB’s engine?
Follow manufacturer recommendations, typically annually or based on running hours, whichever threshold comes first.

Do I need to check tube pressure before every trip?
Yes. Pressure changes with temperature, and a quick check takes only a moment before launching.

What’s the most commonly neglected maintenance task?
Safety equipment expiry dates, particularly flares and fire extinguisher pressure checks, are frequently overlooked.

Does keeping a maintenance log really matter?
Yes. It helps you stay consistent and adds genuine value when you eventually decide to sell the boat.


Related reading: What Is a Rigid Inflatable Boat? · RIB Winter Storage Guide · How to Clean and Protect RIB Tubes · Common RIB Tube Problems and Repairs · RIB Ownership Costs


Lalizas Alpha 170N: CO₂ Cylinder Replacement Guide

A Life-saving CO₂ Cylinder

As you read through this blog, you will notice a strong focus on safety on the water (read the posts).

Life jackets are an essential part of that. That is why this video is well worth sharing with you.


The Lalizas Alpha 170N automatic life jacket is designed to inflate automatically when the wearer enters the water.

During the demonstration, it successfully turned an unconscious person face-up, according to the presenters.

A Lalizas product manager explains that replacing the CO₂ cylinder and activation cartridge after deployment is a straightforward procedure.

The company also recommends replacing the activation cartridge every two years, even if the life jacket has not been used.

Regular inspections help ensure reliable operation when needed.

According to Lalizas, the CO₂ cylinder only requires replacement if it has been discharged or shows signs of corrosion.

The life jacket can also be inflated and deflated manually for testing and repacking.

Proper maintenance, especially replacing the CO₂ cartridge after activation, remains essential to keep the life jacket ready for future emergencies

References

  • Certified according to ISO 12402-3 (CE)
  • Certified per ISO 12401 on all integral black harnesses

This video was published on the Greek Sea and Fishing Merentitis YouTube channel.


How to Trailer a RIB Safely

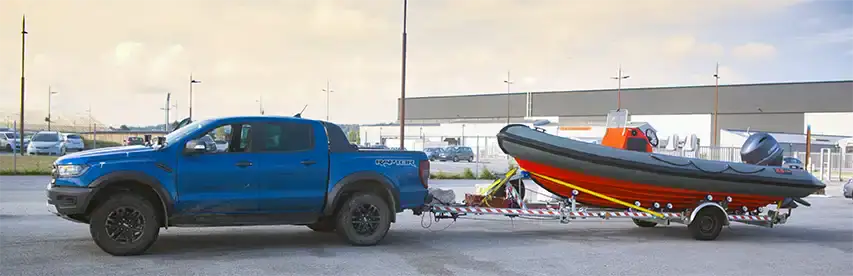
A RIB secured on its trailer to it the road @ RIBs ONLY - Home of the Rigid Inflatable Boat
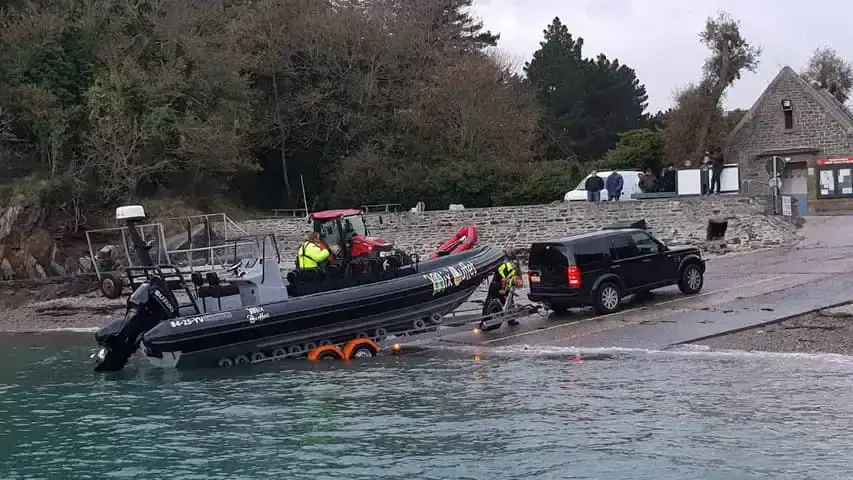
A Vanclaes RIB railer on the boot ramp recovering a RIB

Your Trailer Carries Your Investment

A RIB trailer is as safety-critical as the boat itself, yet it receives far less attention from most owners. Most trailering incidents trace back to setup and towing habits, not to the road or the trailer’s build quality.

This guide covers choosing the right RIB trailer, safe towing practice, and the launching and retrieval steps that prevent the most common mistakes.

Matching the RIB Trailer to the Boat

A correctly matched RIB trailer supports the hull properly across its full length, not just at a few contact points. Mismatched trailers, even if technically rated for the weight, can cause hull stress over time from incorrect support.

Check that roller or bunk positions suit your specific hull shape, particularly for deep-V hulls where incorrect support can create pressure points along the keel line.

Confirming Your Tow Vehicle is Suitable

Before towing anything, confirm your vehicle’s rated towing capacity against the combined weight of boat, trailer, fuel and equipment, not the boat’s weight alone.

Check local regulations regarding towing licence requirements, trailer braking systems and maximum combined weight, as these vary considerably by country and trailer class.

When a RIB's beam is too large, you have to deflate the tubes for safe transport @ RIBs ONLY - Home of the Rigid Inflatable Boat
Nothing wrong here. When a RIB’s beam is too large, you have to deflate the tubes for safe transport – © John Martin

Trailer Maintenance Checklist

A well-maintained RIB trailer prevents the vast majority of roadside problems.

  • Check tyre pressure and condition, including the spare, before every significant trip.
  • Grease wheel bearings on a regular schedule, more frequently for trailers regularly submerged during launching.
  • Test all lights, indicators and brake lights before departure.
  • Inspect the winch, strap or chain securing the boat for wear or damage.
  • Check safety chains and coupling mechanism for correct, secure attachment.

Loading the Boat Correctly

Secure the RIB to the trailer using transom tie-down straps @ RIBs ONLY - Home of the Rigid Inflatable Boat
Secure the RIB to the trailer using transom tie-down straps (yellow in this case) – © Nicolas Hick

Position the boat so weight distributes appropriately over the trailer axle, avoiding excessive tongue weight or, conversely, a rear-heavy setup that reduces steering control.

Secure the boat with both the winch strap at the bow and additional transom tie-down straps for road travel. The winch strap alone isn’t designed to hold the boat in place during transport.

Safe Towing Practice

Driving with a loaded RIB trailer requires adjusted habits compared with normal driving.

  • Allow significantly more distance for braking than usual.
  • Take corners and roundabouts more slowly than feels necessary.
  • Check mirrors regularly for trailer sway, and ease off the accelerator rather than braking sharply if sway develops.
  • Plan routes avoiding unnecessarily tight manoeuvring where possible.

Launching Without Damage

Before backing down the slipway, remove tie-down straps except the winch strap, and disconnect any trailer lights if your setup requires it to avoid electrical damage from submersion.

Back down slowly and evenly, watching for the trailer wheels reaching a safe depth without submerging the vehicle’s exhaust or electrical components.

Release the boat under control, using the winch to ease it off rather than releasing it to float free suddenly, particularly on trailers with steep ramp angles.

Retrieval Without Stress

Line up the trailer centrally in the water before attempting to drive the boat on, rather than trying to correct alignment once the boat is already approaching.

Use the winch to draw the boat fully onto the trailer and seated correctly against the bow stop before pulling the trailer out of the water, avoiding a boat that shifts or turns during the final pull-out.

A Quick Pre-Trip Trailer Checklist

  1. Confirm combined weight is within your tow vehicle’s rated capacity.
  2. Check tyres, bearings and lights on the trailer.
  3. Load the boat with correct weight distribution.
  4. Secure both winch strap and transom tie-downs for road travel.
  5. Drive with adjusted following distance and cornering speed.

For buyers evaluating a used boat that includes a trailer, our Buying a Used RIB: Complete Inspection Guide covers what to check on the trailer itself before purchase.


Frequently Asked Questions

How often should I service my RIB trailer’s wheel bearings?
Roughly once a season for regular use, more often if the trailer is frequently submerged in saltwater during launching.

Is it safe to tow with only the winch strap securing the boat?
No. Always add separate transom tie-down straps for road travel; the winch strap alone isn’t designed for that load during transport.

Do I need a specific licence to tow a RIB trailer?
This depends on combined weight and your local regulations, which vary considerably by country. Always check current requirements for your specific setup.


Related reading: What Is a Rigid Inflatable Boat? · What Size RIB Do I Need? · Buying a Used RIB: Complete Inspection Guide


How to Drive a RIB in Rough Water

Original video footage used with permission of
Paul Liddiatt, Sales and Marketing Manager at Ribcraft, fully edited by Medianaut, Nautical News Media

Techniques and Judgment for Handling Waves and Swell Safely

To drive a RIB in rough water is a different skill from calm-water handling, and it can’t be improvised safely.
Wave shape, direction, and boat trim all interact, and getting them wrong can cause loss of control quickly.

This guide covers the core techniques experienced RIB skippers use, along with the judgment calls behind them.

It might be of interest to have beforehand the needed information of sea state and wind: Wind, Waves, Swell: Beaufort vs Douglas Sea Scale.

Before You Go: Reading Conditions

Always check the marine forecast for wind speed, wave height, and wave period, not just a general “sunny” outlook.

Short wave period with meaningful height creates steep, closely-spaced waves that are far harder to handle than long swell. Local knowledge matters. Tidal races, headlands, and river mouths can create dangerous conditions that generic forecasts don’t capture.

If in doubt, don’t go. Turning back early is always safer than pressing on into deteriorating conditions.

Our guide Are Rigid Inflatable Boats Safe? explains how hull design and tube volume affect behaviour in waves.

Drive is All About Trim and Throttle Control in Waves

Trimming the outboard down (bow down) generally improves control and reduces slamming in head seas.

Trimming up can help in following seas, keeping the bow from digging into the wave ahead.

Reduce speed before conditions demand it, not after the boat has already become difficult to control.

Constant micro-adjustments to throttle, easing off over crests and applying power in troughs, smooth out the ride considerably.

Avoid locking the throttle at a fixed speed; rough water requires continuous, active management rather than a set-and-forget approach.

Approaching Waves at the Right Angle

Taking waves directly on the bow, at a slight angle, is generally the safest approach in head seas. Hitting a wave square-on at speed causes hard slamming, uncomfortable and potentially damaging to hull and occupants alike.

Taking waves too far off the bow risks the boat rolling or the tubes catching the wave unpredictably. Adjust your heading slightly as each wave approaches rather than holding a rigid, fixed course throughout.

Out on training and then this happens. Watch until the end

RNLI Whistable training session gone wrong: capsized by incredibly rough seas. See the PowerboatTrainingUK” YouTube channel

Handling Following Seas

Following seas (waves from behind) are often more dangerous than head seas, despite feeling calmer initially. The risk is broaching: the stern is pushed sideways by a wave, turning the boat unexpectedly and violently.

Reduce speed in following seas and stay alert to the boat’s tendency to slew as waves pass underneath. Avoid surfing down wave faces at speed; this significantly increases the risk of losing directional control.

Handling Beam Seas

Beam seas (waves from the side) create the most uncomfortable and potentially unstable motion of any approach.

Where possible, alter course to take waves more from ahead or behind rather than directly abeam. If beam seas are unavoidable, reduce speed and keep weight distribution balanced to minimise rolling.

When to Slow Down or Turn Back

Persistent spray over the bow, difficulty maintaining course, or repeated hard slamming are all signals to reduce speed immediately. If conditions are still deteriorating after slowing down, turning back is the appropriate decision, not a failure.

Fatigue affects judgment quickly in rough conditions; a tired skipper makes worse decisions than a rested one. Brief all crew before conditions worsen, including where to hold on and what to do if visibility drops.

Common Mistakes That Cause Loss of Control

Excessive speed for the conditions is the single most common cause of loss of control in rough water. Fixed throttle settings, rather than active management, leave the boat unprepared for sudden changes in wave height.

Poor weight distribution, with too much weight aft or to one side, worsens handling in waves significantly. Ignoring early warning signs, hoping conditions will improve, often leads to a much harder decision later.

RIB handling in Rough Water @ RIBs ONLY - Home of the Rigid Inflatable Boat
© 2026 Medianaut, Nautical News Media

Building Rough-Water Confidence Safely

Practice in moderate conditions before attempting genuinely rough water, ideally with an experienced skipper aboard. Start close to shelter and safe harbour, gradually extending range as your judgment and boat-handling improve.

Every RIB and every set of conditions behaves slightly differently; experience with your specific boat matters considerably.

Our guide Best RIB for Rough Water: What Really Matters? explains how hull shape and design affect this behaviour.


To give you a pretty good idea what seas you can encounter, watch these impressive training videos by OLM.


Frequently Asked Questions

What’s the biggest mistake new RIB skippers make in rough water?
Maintaining too much speed for the conditions, often because the boat still feels controllable at that moment.

Are following seas really more dangerous than head seas?
Often yes, due to broaching risk. Following seas can feel deceptively calm while carrying significant hidden risk.

Should I trim up or down in rough water?
Generally down (bow down) in head seas for control, and up in following seas to avoid bow-digging.

When should I simply turn back?
When speed reductions no longer restore control, when fatigue sets in, or when conditions keep worsening rather than settling.


Related reading: What Is a Rigid Inflatable Boat? · Are Rigid Inflatable Boats Safe? · Essential Safety Equipment for a RIB · Best RIB for Rough Water: What Really Matters? · Can a RIB Sink? · Wind, Waves, Swell: Beaufort vs Douglas


×